Uncategorised
QTAFI
Tools for questionnaire development, data documentation (codebook) and analysis.
- QTAFI online - development and administration of online questionnaires
- QTAFI paper - development of ready-to-publish paper questionnaires, automatic creation of a QTAFI online questionnaire, SPSS data definition and tables syntax
- QTAFI scanner - automatic data capture with a scanner.
1. QTAFI online
QTAFI online is a programm for development and administration of online questionnaire written by Martin Guist (Kassel, Germany). It is an open source project and can be used under the GPL. QTAFI was used in hundreds of tracer studies worldwide. The latest version was developed with support of the European Training Foundation (ETF).
Latest version: QTAFI-ETF (November 2015)
For the installation on a LINUX server:
Download QTAFI-ETF server version (QTAFI_ETF_1.0_server.zip, 37 MB)
For the installation on your PC:
Download QTAFI-ETF desktop version (QTAFI_ETF_1.0_desktop.zip, 45 MB)
The JAVA source code
Download QTAFI-ETF source code (JAVA) (QTAFI_ETF_1.0_src.zip, 40 MB)
Short introductions to the new QTAFI version are provided in two presentations of Tamara Arutyunyants: (Arutyunyants_QTAFI_online_2015a.pdf, 1 MB)
(Arutyunyants_QTAFI_online_2015b.pdf, 1 MB)
Tamara Arutyunyants has also written a guide for the use of QTAFI-ETF:
Download the guide (QTAFI_ETF_handbook_2015.pdf, 2.8 MB)
Earlier versions of QTAFI
QTAFI online 2.0
Version 1 was launched 2003 and is not more supported.
Version 2 was launched 2008 and is used in many surveys.
Download the programme (online_QTAFI2_install.zip, 6.5 MB)
2. QTAFI paper
Latest version: August 2021
Download the QTAFI paper files (VBA) Download QTAFI paper
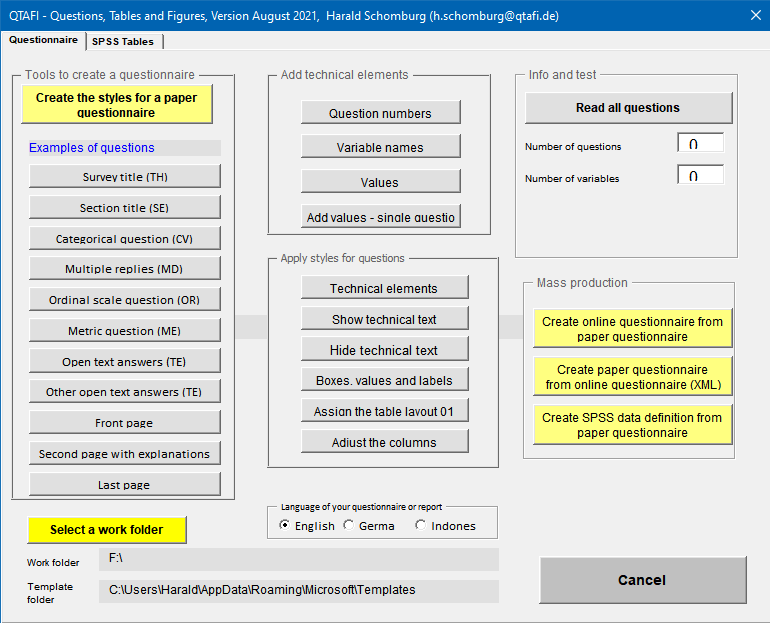
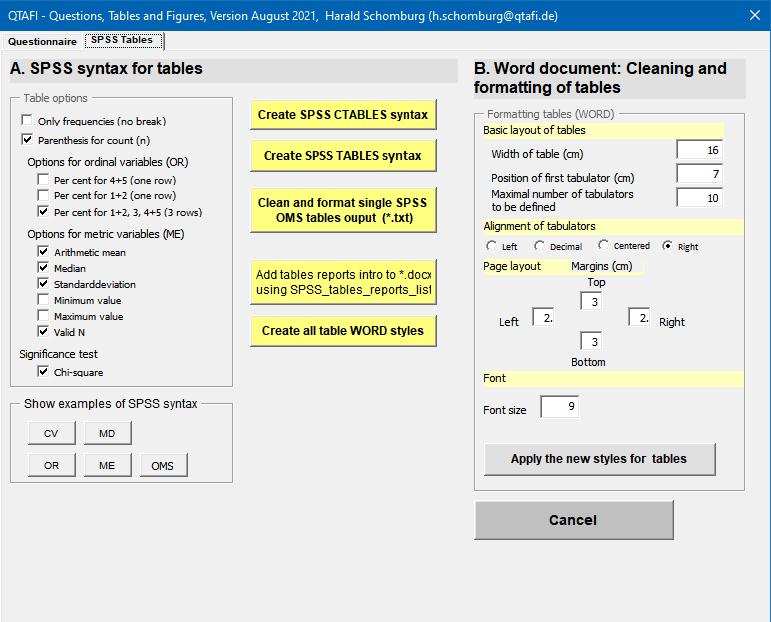
QTAFI paper was developed by Harald Schomburg first around 1990. A documentation of the version of the year 2003 was published in the tracer study handbook:
3. QTAFI scanner
QTAFI scanner is a tool for automatic data capture of paper questionnaires written by Martin Guist (Kassel, Germany). It is an open source project and can be used under the GPL.
Download the programme (scanner_QTAFI_install.exe, 14 MB)
QTAFI scanner
QTAFI scanner is a tool for automatic data capture of paper questionnaires written by Martin Guist (Kassel, Germany). It is an open source project and can be used under the GPL.
Download the programme (scanner_QTAFI_install.exe, 14 MB)
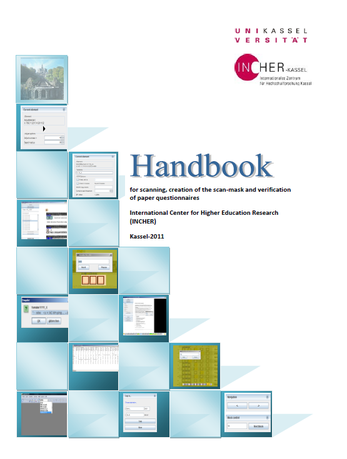
Tamara Arutyunyants (University Kassel, Germany) has written a handbook which helps to learn the use of the programme.
Download the handbook (scanner_QTAFI_handbook_2011.pdf, 3.6 MB)
Excerpt from the handbook:
2. Scanning paper questionnaires
2.1 Preparation for scanning
Before starting working with blank and filled-out paper questionnaires, they should be scanned.
Every filled-out paper questionnaire has its ordinal number (ID), which is indicated in the upper right corner. It is recommended to scan the questionnaires in the order they are following.
2.1.1 Cutting paper questionnaires
The binding part of paper questionnaires should be cut with the help of a cutter in order to bring it in the right format and be able to scan all the pages automatically. The cutter is set on A4 format. After cutting the questionnaire and before scanning it, the last pages containing no data relevant for the analysis are to be removed. To such pages refer, if applicable: page with gratitude for cooperation, list with fields of study, etc.
2.1.2 Opening the relevant file
Before scanning questionnaires the relevant folder is to be opened where the blank questionnaire as well as filled-out questionnaires of all universities are going to be saved. The name of the folder is optional. Below is the example of the folder name used in INCHER. This folder is named with the year of the surveyed cohort. Under this folder another folder is created with the name "_PAPER". Within the folder "_PAPER", new folders are opened with the names of universities from which the questionnaires are. In these folders all respective scanned filled-out questionnaires are to be saved.
Within a folder of a particular university another sub-folder is created with the name "_blank". In the sub-folder "_blank" a blank questionnaire, the created scan mask and verified data are saved.
2.2 Scanning paper questionnaires
To scan paper questionnaires there is no need for a special scanner that is used primarily in copy shops. For example, a scanner Canon DR-4010C, which is shown on the picture, is used at INCHER for scanning paper questionnaires.
2.2.1 Settings of a scanner
Before scanning paper questionnaires it is important to do some basic scanning settings such as: resolution, scan color mode, brightness, contrast and scanning sides.
Resolution determines image quality; it should be set on 200 dots per inch (dpi). 300 dpi is also possible and even better; however it increases the size of the files to a high extent.
What is very important is that you do not change the resolution during the whole process, i.e. during the scanning both blank and filled out questionnaires.
Scan color mode - black and white.
Brightness and contrast depend on the paper that is used for questionnaires, whether it is a bit dark or bright. When setting the brightness and contrast make sure that the given by respondents answers are visible upon scanning.
It is advised to scan multiple images to separate files. For this choose the option "multiple pages to a single file" and indicate the number of pages per questionnaire in the settings. This will allow a scanner to scan files and allocate the given number of pages to one file. It is important to place the questionnaire pages on a scanner in a correct order so that the file with a questionnaire contains all relevant pages of a questionnaire in a sequential order.
As questionnaires are printed out as double-sided they should be scanned as double-sided as well. In the option "scanning sides" choose a duplex (double-sided) scanning.
2.2.2 Tiff file - save type file
Scanned files should be saved as tiff files (*.tif) - Tag Image File Format, a widely used format for storing image data. Each scan represents a different image (or tiff file); however, the images can be concatenated to create one large image (file) with multiple pages (a multi-page tiff file). In this case all pages together form a single document.
For facilitation of the work and preventing the loss of scanned questionnaire pages it is recommended to save images as multi tiff files, e.g. store all pages of a questionnaire in one file. This can be done with the help of the option of a scanner "multiple pages to a single file" described above in the section settings of a scanner.
2.2.3 Name of a tiff file
The name of a file of a filled-out questionnaire should comprise the code of a university from which the questionnaires are, if relevant the code of a course degree as well as the ID of a questionnaire.
Code of a university: The institution which is responsible for receiving all the questionnaires and working with them should create a code for each particular university. A code can consist of an ordinal number or a short version of a university name.
If there are variations between the questionnaires with regard to the course degree, a code should be created for different course degrees. A code can consist of an ordinal number. Below is an example of the codes for some degree courses applied in INCHER. The codes below range from 1 to
1 - General subjects and Bachelor and Master degrees; 2 - Law;
3 - Teaching degree; 4 - Medicine; 5 - PhD.
Underline is followed by the code of a university and if relevant, code of a course degree.
Besides the codes of a university and a course degree, it is advised to provide the ID number of a scanned questionnaire. The number should consist of four digits. If the ID of a questionnaire is 1, the number 1 is to be followed by three zeros, e.g. 0001, 0002…, 0015…, 0143, etc.
Thus, the tiff file of the sample questionnaire in this handbook is named: Uni XXX_0001, where Uni XXX is the code of a university and 0001 is the ID of the first questionnaire.
3. QTAFI-Scanner / Introduction to the Scan-Mask
3.1 Definition
What is the QTAFI-Scanner?
The QTAFI-Scanner1 is a tool for computer-aided detection of paper questionnaires. The QTAFI-Scanner recognizes the relevant data from the scanned filled-out questionnaires and adds them together to a record. Before, however, the QTAFI scanner can fulfill this function the users must create appropriate scan masks.
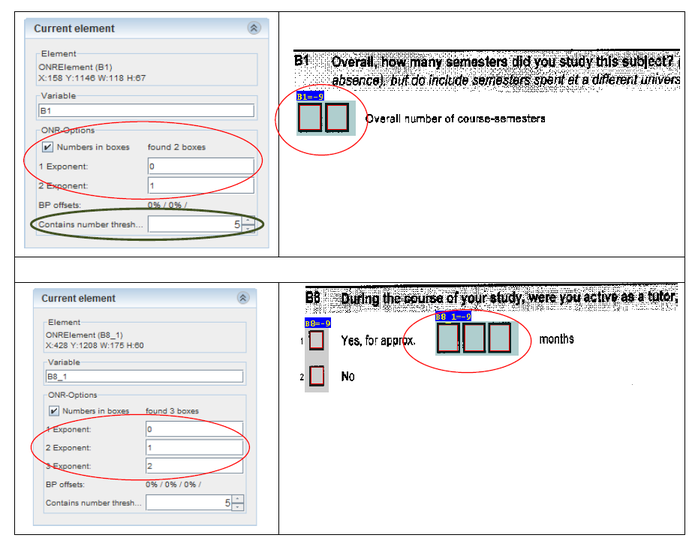
What is the Scan-Mask?
A scan mask defines the fields from which the QTAFI scanner extracts its data. The mask defines - on the simple principle of a template - page by page, which sections of a paper questionnaire should be tested for relevant answers.
The QTAFI scanner does not certainly automatically recognize which characters from the questionnaires were preprinted and which characters were handwritten by the respondents. It can only determine the proportion of pixels in a given field, infer from the (non-) presence of characters and translate this information into numbers. Therefore it rests on the user to detect the relevant responses in the scan masks.
Conditions
The QTAFI scanner can be installed on your own computer by running the application "Install scanner.exe".
The definition of scan masks must in each case be carried out at the blank questionnaire. As it was mentioned above, the tiff files of questionnaires are to be stored in the subfolder _blank of each university. In addition, each of these sub-folders should contain a specific for a higher education
1 QTAFI ("Questions, Tables and Figures") is a computer-aided system for the management of surveys. Refer
3.2 Opening the QTAFI scanner
The opened QTAFI scanner - firstly without the data - is composed of three elements: (1) a toolbar, (2) a sidebar with a number of tabs and (3) a black work area.
The opening screen: assign your questionnaires.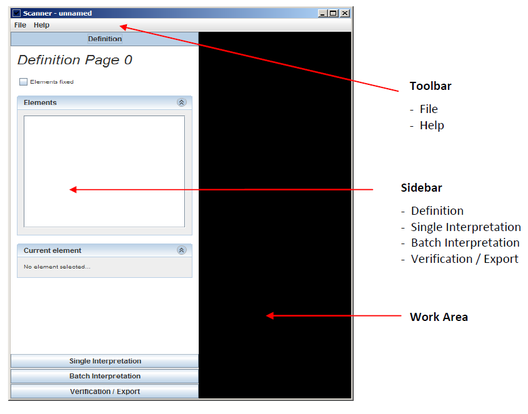
Definition of variables
QTAFI online
QTAFI online is a programm for development and administration of online questionnaire written by Martin Guist (Kassel, Germany). It is an open source project and can be used under the GPL. QTAFI was used in hundreds of tracer studies worldwide. The latest version was developed with support of the European Training Foundation (ETF).
Latest version: QTAFI-ETF (November 2015)
For the installation on a LINUX server:
Download QTAFI-ETF server version (QTAFI_ETF_1.0_server.zip, 37 MB)
For the installation on your PC:
Download QTAFI-ETF desktop version (QTAFI_ETF_1.0_desktop.zip, 45 MB)
The JAVA source code
Download QTAFI-ETF source code (JAVA) (QTAFI_ETF_1.0_src.zip, 40 MB)
Short introductions to the new QTAFI version are provided in two presentations of Tamara Arutyunyants:
(Arutyunyants_QTAFI_online_2015a.pdf, 1 MB)
(Arutyunyants_QTAFI_online_2015b.pdf, 1 MB)
Tamara Arutyunyants has also written a guide for the use of QTAFI-ETF:
Download the guide (QTAFI_ETF_handbook_2015.pdf)

Earlier versions of QTAFI
Version 1 was launched 2003 and is not more supported.
Version 2 was launched 2008 and was used in many surveys.
Download the programme (online_QTAFI2_install.zip, 6.5 MB)
A QTAF online handbook was written by Dewi Juliah Ratnaningsih (Open University, Jakarta, Indonesia) in Bahasa Indonesia and was used in many workshops at universities in Indonesia who are using QTAFI2 online for their tracer studies.
Download the handbook in BAHASA INDONESIA (PDF, 1.3 MB)
Install online.QTAFI engine
Quick instruction (written by Bhina Patria, UGM Yogjakarta)
Here is the quick instruction to install online.QTAFI in your own server. More detailed instructions will be provided later.
If you are familiar with CMS installation (e.g. Wordpress, Drupal, Joomla, etc), the installation of online.QTAFI is not that different. These are the quick steps to install online.QTAFI:
- Download and unzip online.QTAFI engine and put the files in your server.
- Create a database in your web server, as well as a MySQL user with a full access to the database.
- Open config file which is located under engine folder (engine/config.php). Change some paths (start from line 54) according to your server address. Configure also the information about your database (start from line 149).
- Configure the path of in startClient.php which is under /webstart. Configure some paths according to your server setting (line: 25, 38, 39, 42)
- You are finish with the installation! Now access the administrator login with your browser, go to http://yourserverdotcom/engine/admin.php. You can login the first time with user: admin, password: 12345.

As a super administrator, now you can make a new project or a new online questionnaire. To add a new project just click Append New Case.
After that an empty project is created. You should then set the project name, user name, and also the password. Just click on the word [Empty] under name and project column to set it. Don't forget to also set the password, click [SET] under PIN column. 

Page 3 of 3
- You are here:
-
Home

- Uncategorised